Exercise: Getting Started with the 3pi robot
Objective
Get started in experimenting with a mobile robot, using Pololu 3pi Robot platform: "a complete, high-performance mobile platform featuring two micro metal gearmotors, five reflectance sensors, an 8×2 character LCD, a buzzer, and three user pushbuttons, all connected to a C-programmable ATmega328 microcontroller." In this excercise, we will set-up the Arduino IDE for work with the 3pi, and load a few different pieces of existing example code.
Steps and observations
- Get the necessary hardware for working with the 3pi robot:
- 3pi Robot
- Pololu AVR Programmer or Pololu AVR Programmer v2
- Configure your Arduino Environment setup to use the 3pi robot.
Note 1: In the later versions of the Arduino IDE, you must make your own "hardware" folder in ~/Docuemnts/Arduino and added the pololu software to that;
Note 2: If the Pololu examples don't show up under examples in your Arduino IDE, then manually copy the contents of "libpololu-arduino/avr/libraries" into ~/Documents/Arduino/libraries
Note 3: If you are using a v2 AVR programmer, install the software for it
- Load a line-following program onto the 3pi, create a "maze", test algorithm by experimenting with several different maze designs
- Tweak the code for the line-following program to create behaviors that are different than the original; consider subjective and affective descriptions like "nervous", "shy", "hasty", or "drunk" as guides for how to modify the existing program to give the impression of a more personified robot.
Comments
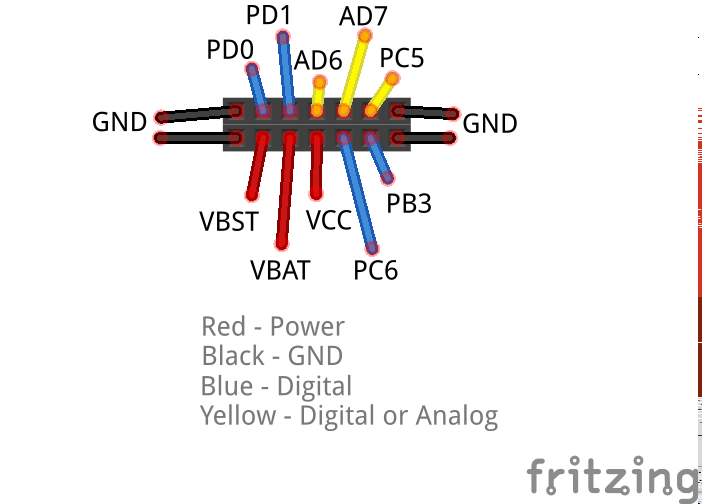
This is the pinout of the header on the 3Pi. Check the here
to convert the 3Pi pins to pins you can use in your Arduino Code.
Other Resources
- Pololu 3pi Robot Resources
- Pololu 3pi Rbot User's Guide
- Pololu AVR Programming Guide
- Videos of 3pi robot projects